How to send packages via convenience stores: GS25
What is GS택배
Vocabulary
Process Overview
How to create a GS택배 account
How to make a booking for domestic shipping
How to send your packages after booking
How to use 반값택배
What is GS택배
Process overview:
Step 1: Create an account
Step 2: Make a booking
Step 3: Send the package
Vocabulary:
• 반값택배: Half-priced delivery/shipping. This is when the sender sends the item at a convenience store and the receiver goes to a convenience store near their address to pick up the item
• 국내택배: Domestic delivery/shipping. The sender sends the item at a convenience store, and the receiver receives it at their address
• 국제택배: International delivery/shipping
예약: Booking/Reservation
How to create a GS택배 account
-
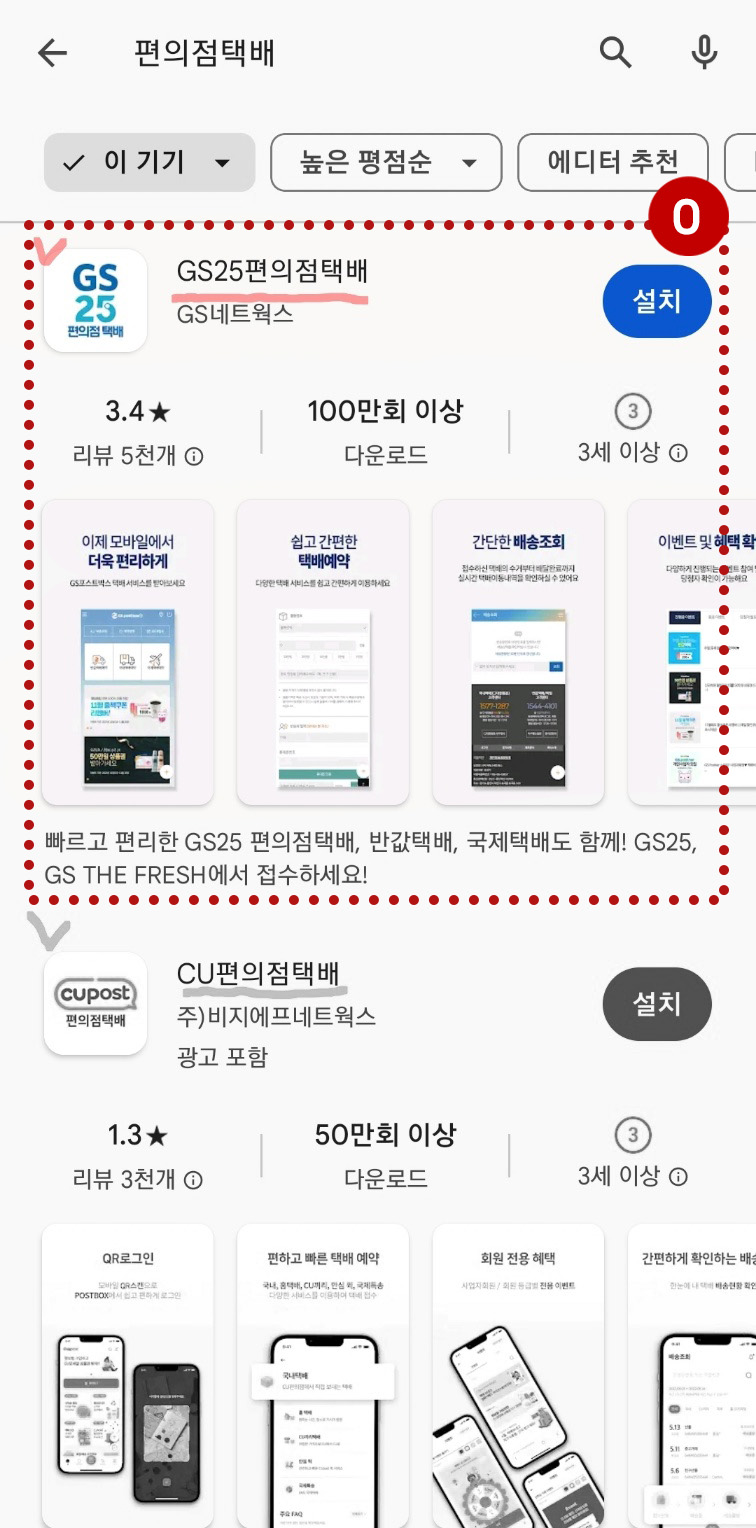
Step 0: Download the GS25편의점택배 app on your phone
-
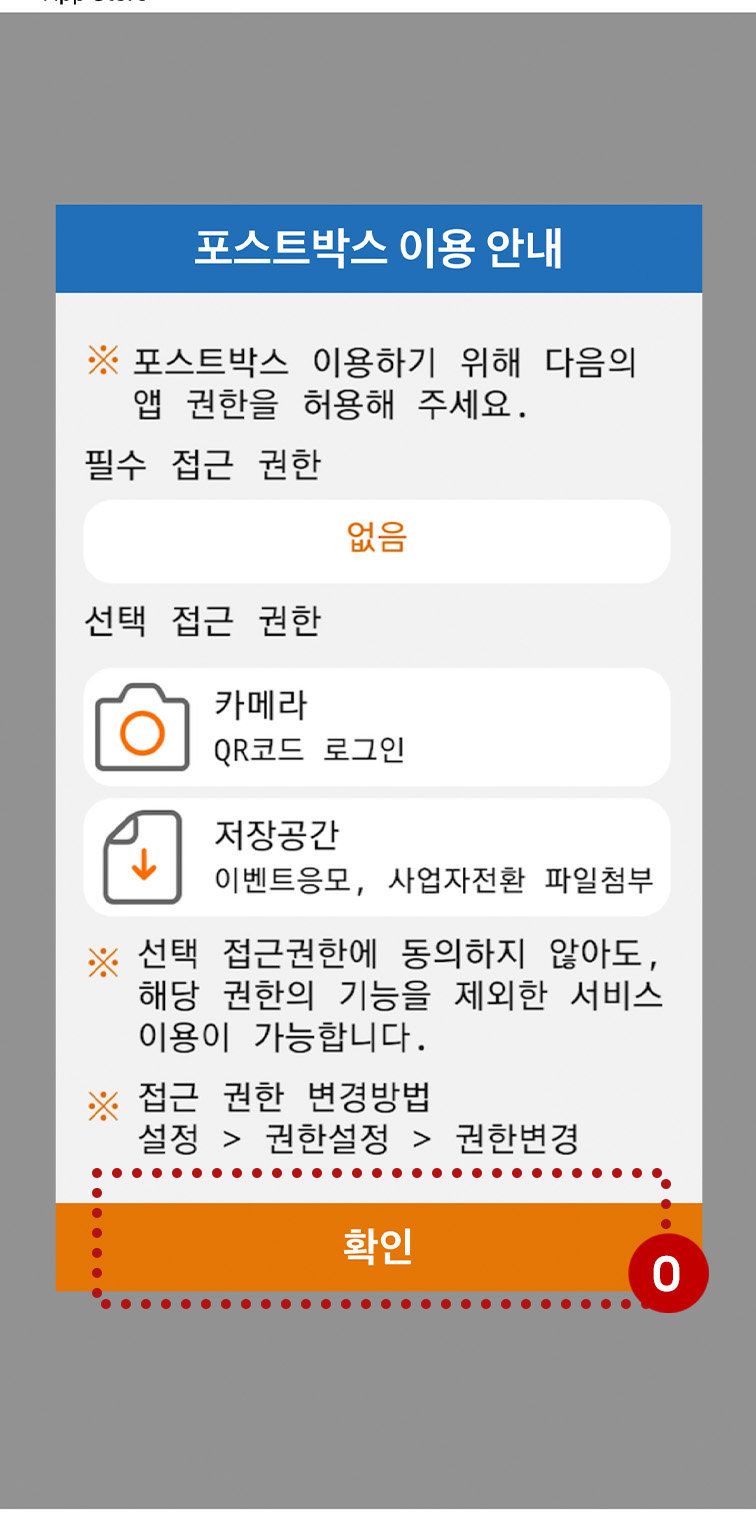
Popup messages asking for permission to access your phone's camera and other features will appear
-

Popup messages asking for permission to access your phone's camera and other features will appear
-
Popup messages asking for permission to access your phone's camera and other features will appear
-

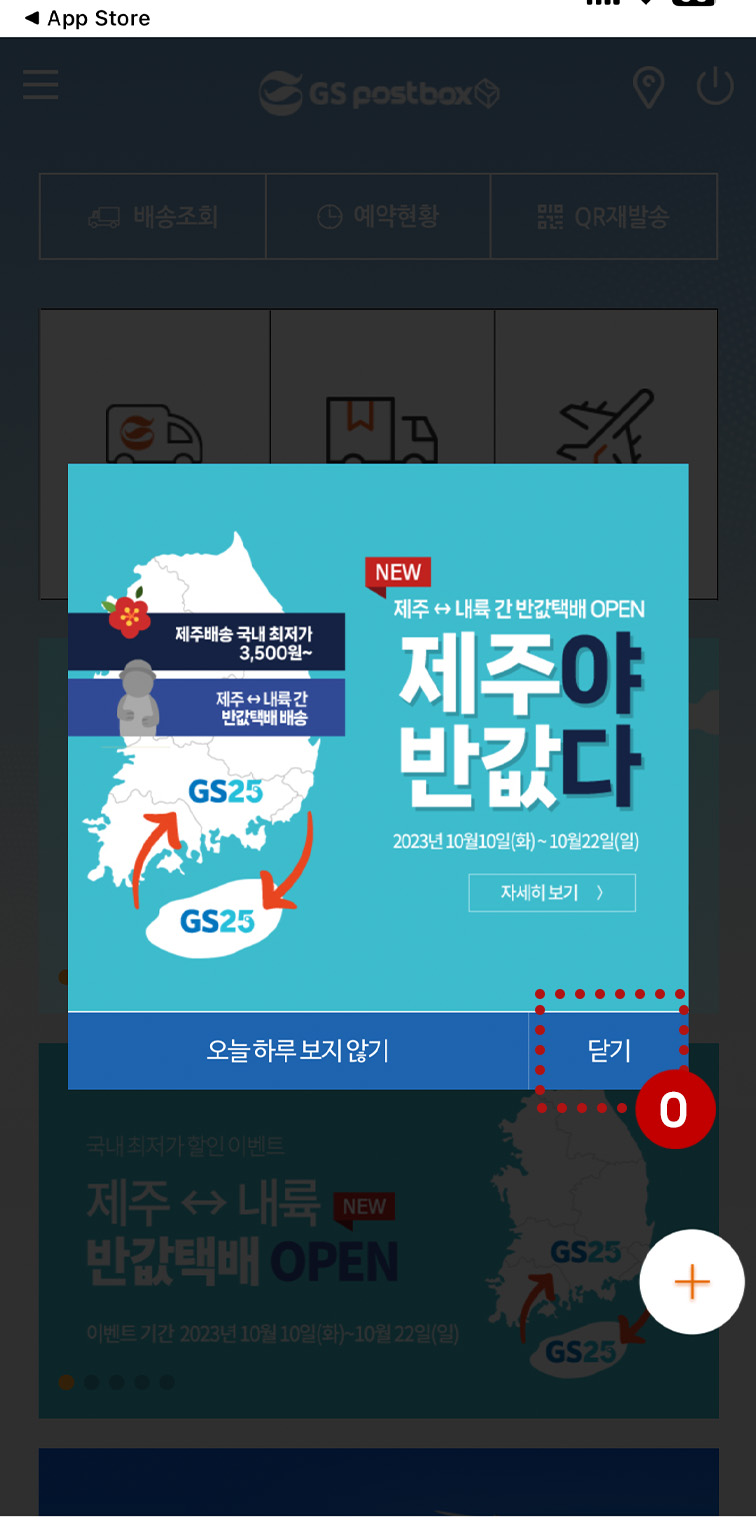
Step 1: On the main screen, click on the 국내택배예약 button
-
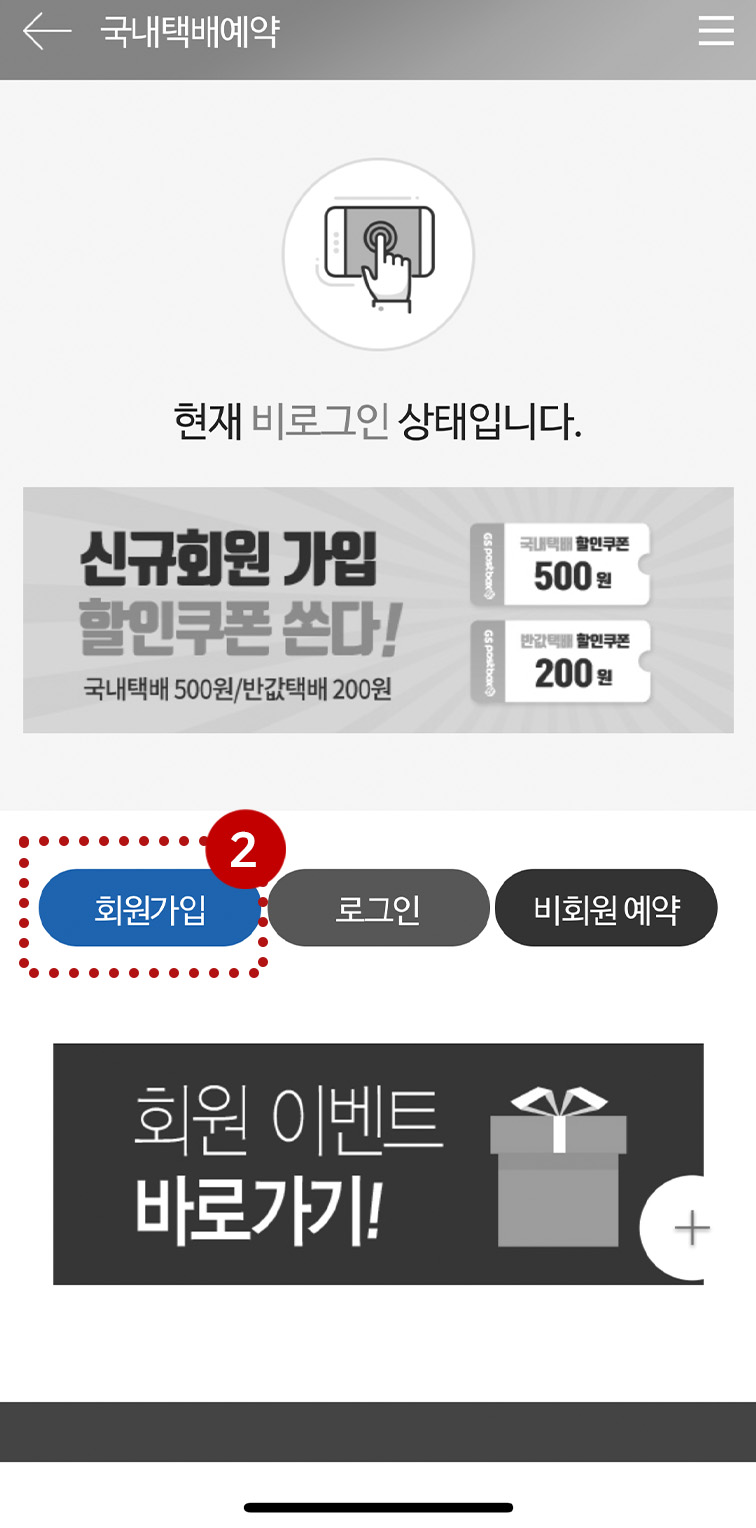
Step 2: Click on the 회원가입 button
-
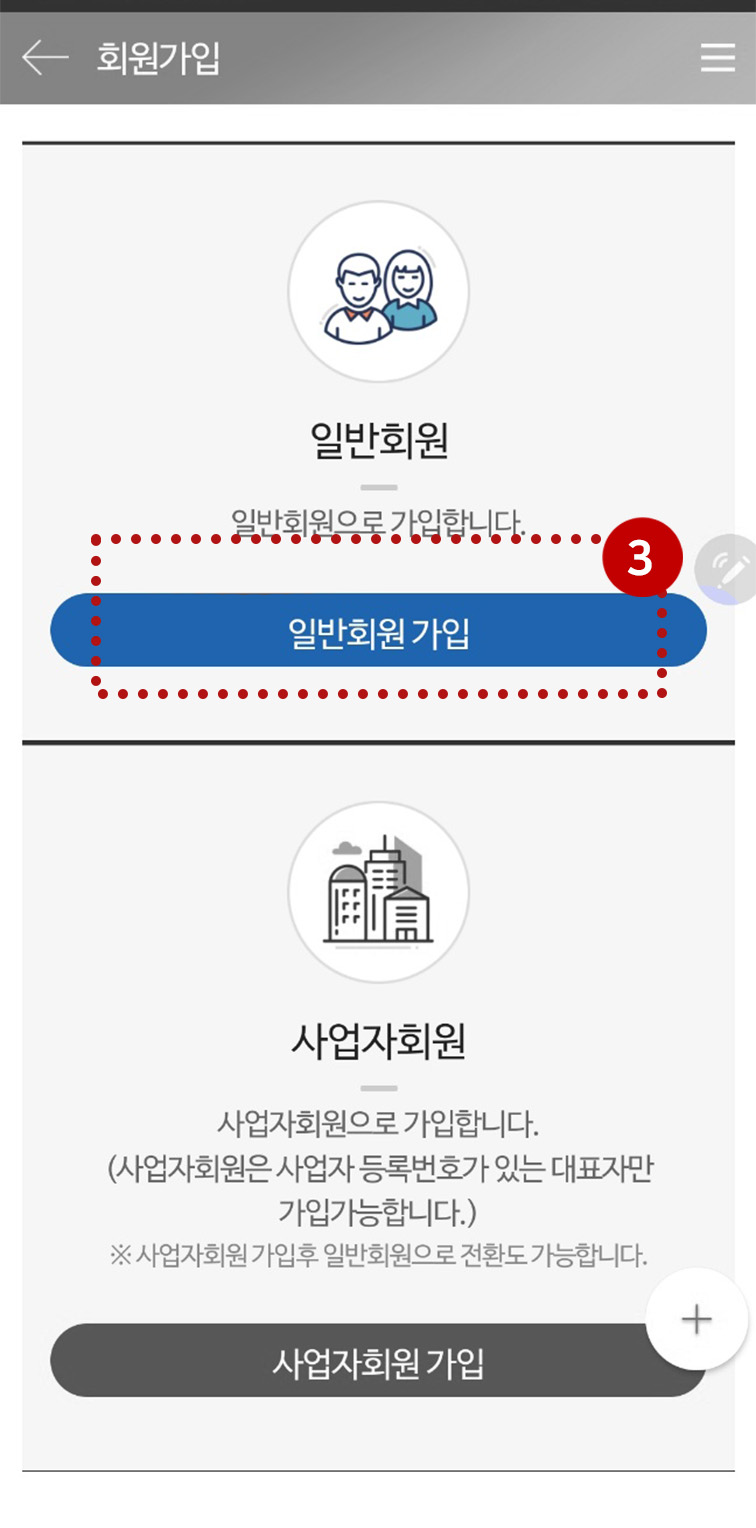
Step 3: Click on the 일반회원 가입 button if this is for personal use
-

Step 4: You will have to verify your identity on the app, click on the 휴대전화 인증 button
-
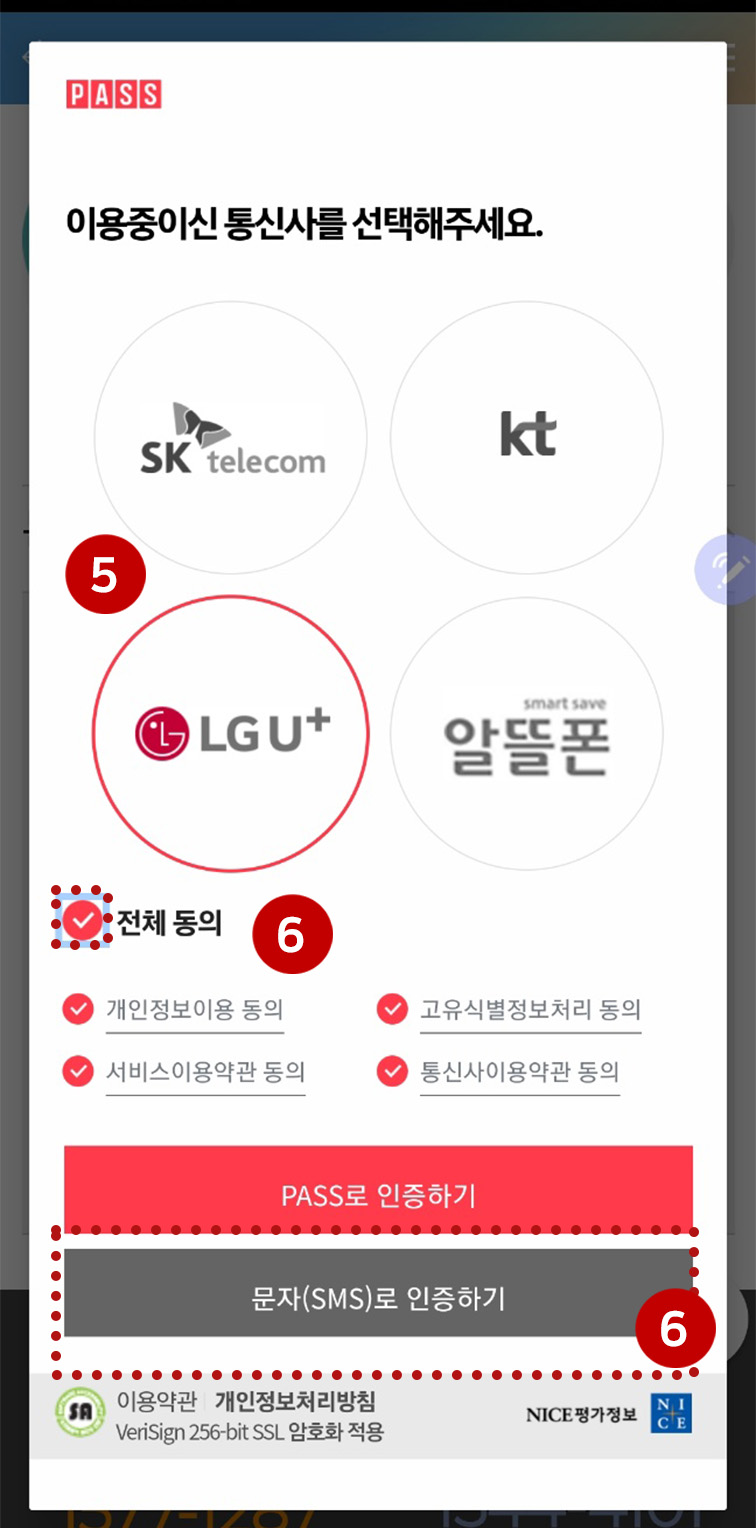
Step 5: At the verification screen, select your telecom
Step 6: Click on 전체동의 then click on 문자(SMS)로 인증하기 - You can also use the PASS 인증 if you already have the PASS application
-
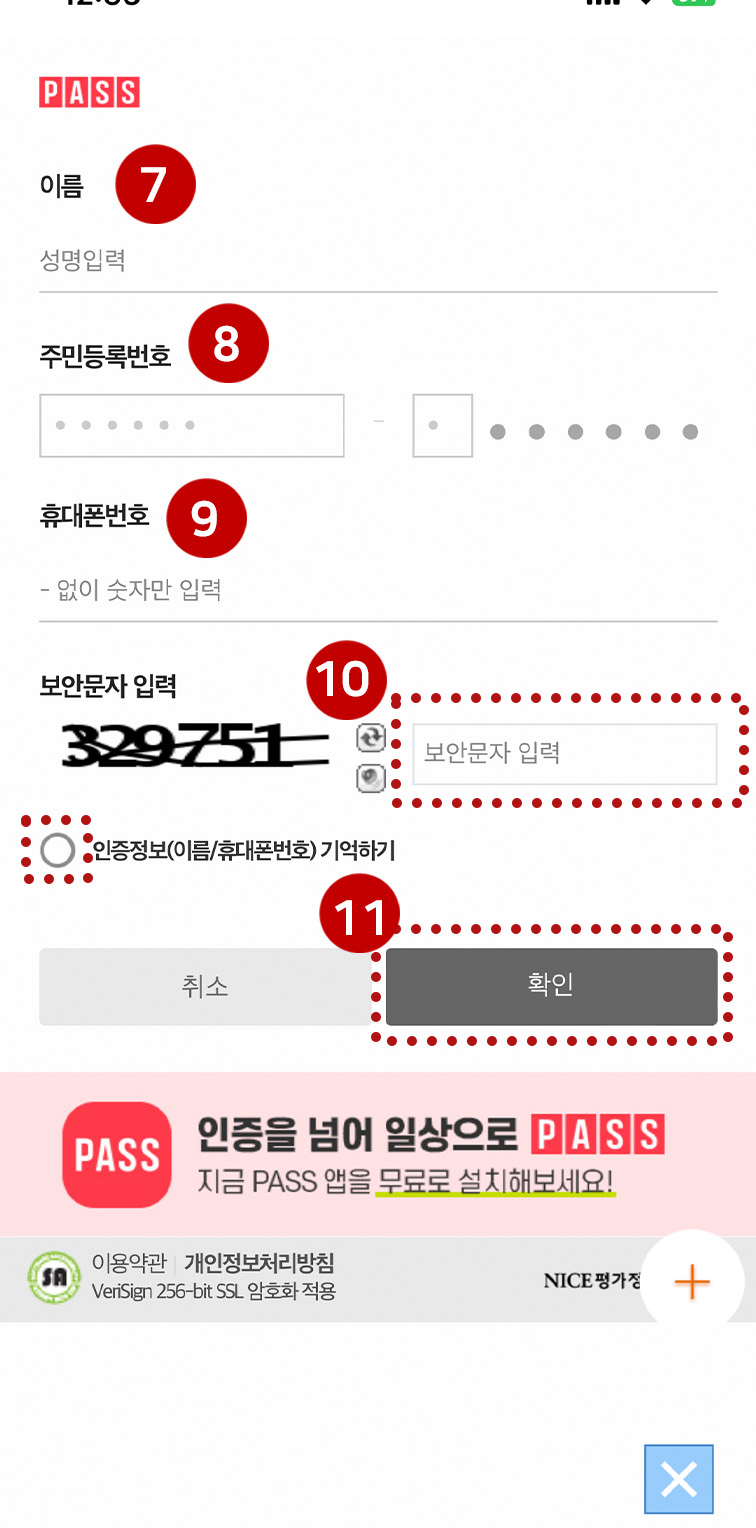
Step 7: Enter your Name, as indicated on your Resident card (all caps and family name first)
Step 8: Enter your Resident Number
Step 9: Enter your phone number
Step 10: Enter the captcha code and click on the 인증정보(이름/휴대번호)기억하기
Step 11: Click on the 확인 button
-
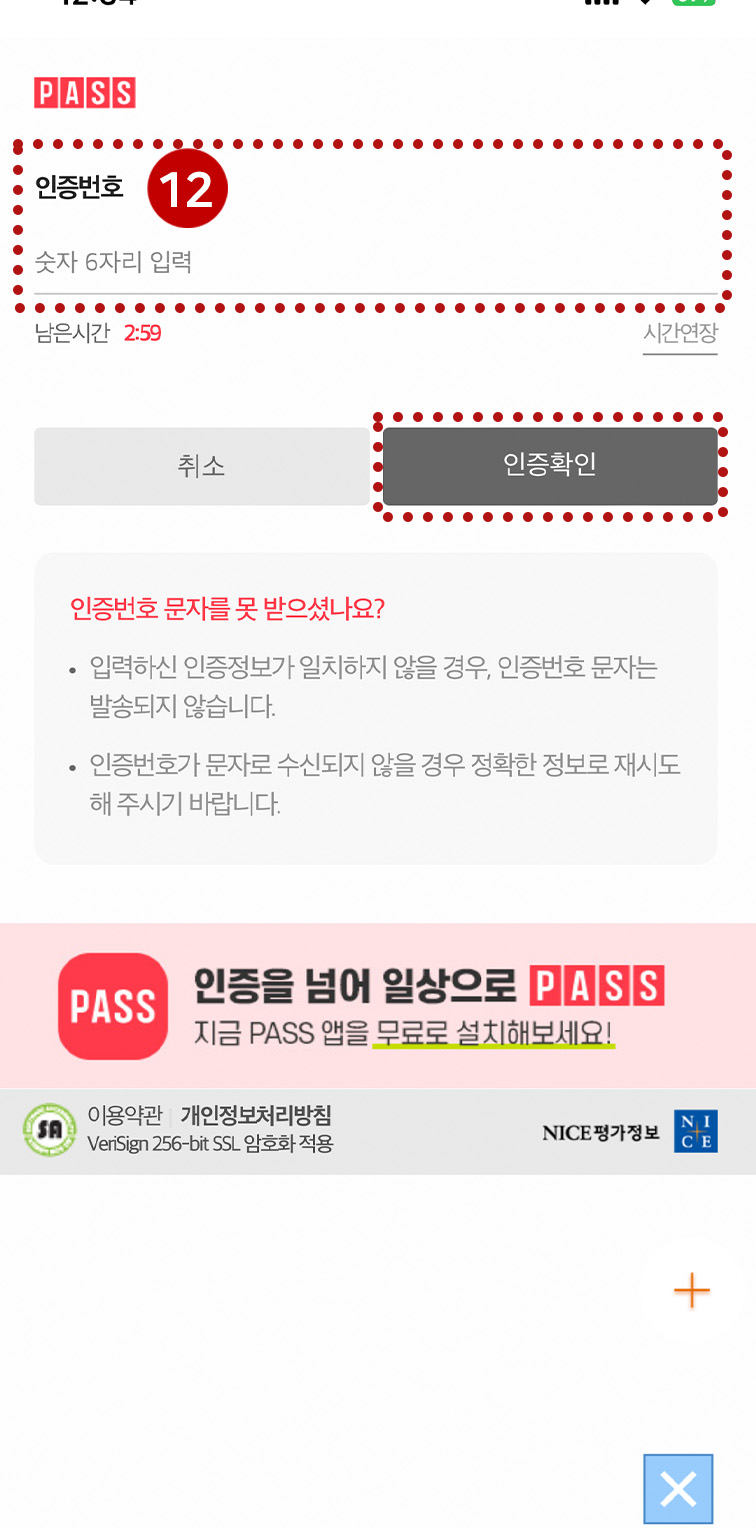
Step 12: Under the 인증번호 field, enter the verification code sent to your phone then click on the 인증확인 button
-
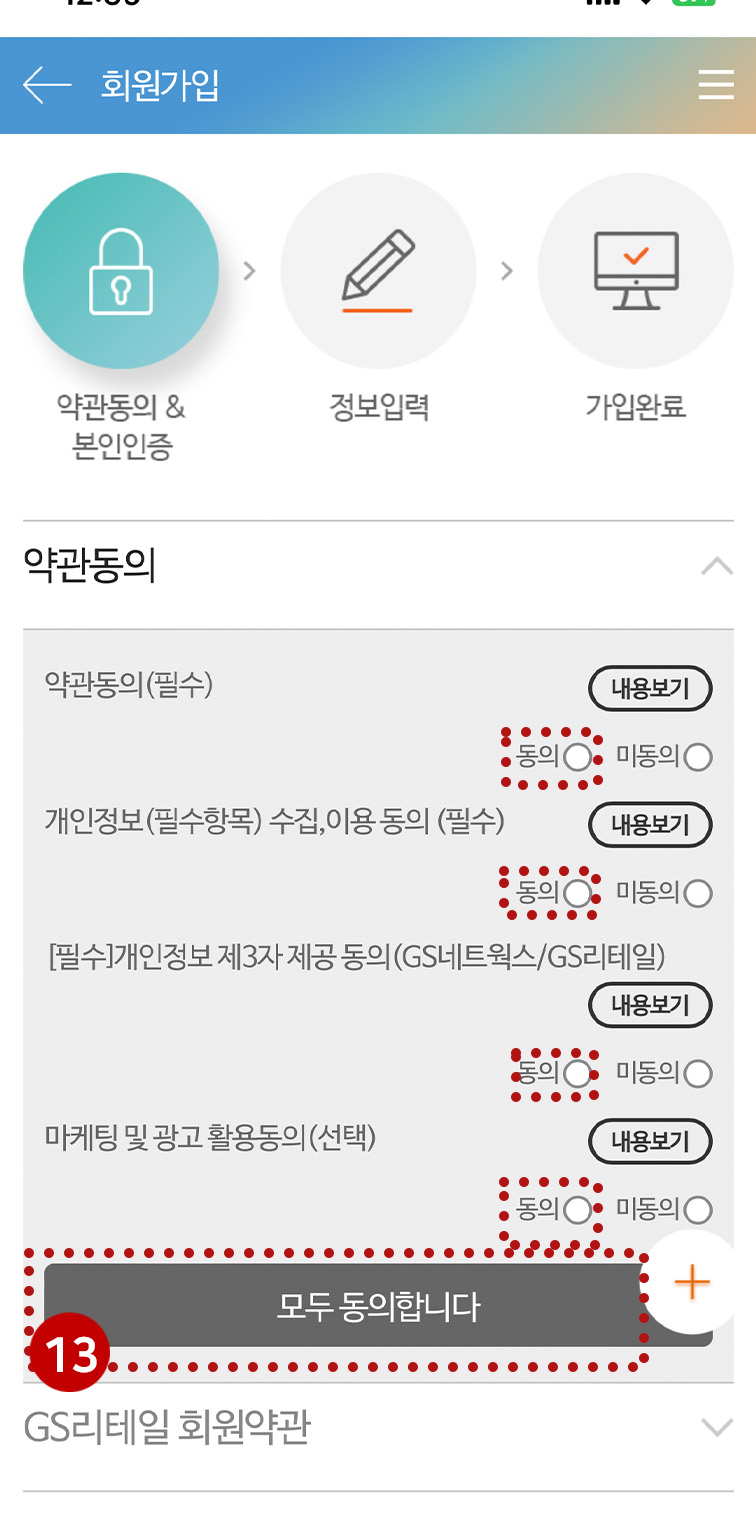
Step 13: At the 약관동의 page, you have to agree to the terms and conditions of the service. You can just select the 모두동의합니다 to agree to all the terms and conditions, or you can click on the 미동의 on the optional (선택) items
-
-

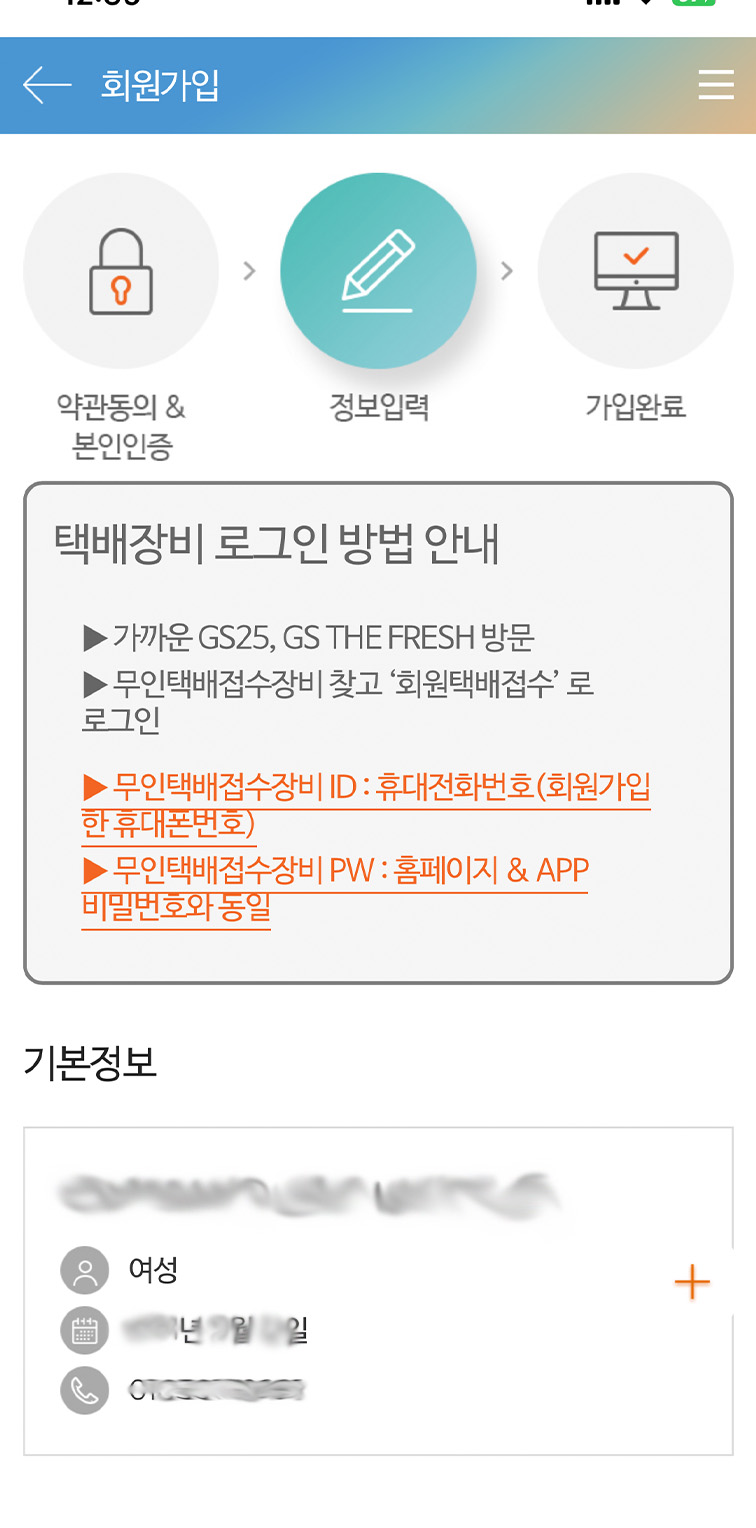
Step 14: After the verification process, you can now input your information. In the 아이디 field, type in your desired ID (should combination of 5-12 english + numbers). then click on the 종복확인 button to verify if the ID is available.
Step 15: In the 비밀번호 portion type in your desired password. Make sure to type your password again in the bottom field
Step 16: In the next field, click on the 주소검색 button to enter your address.
-
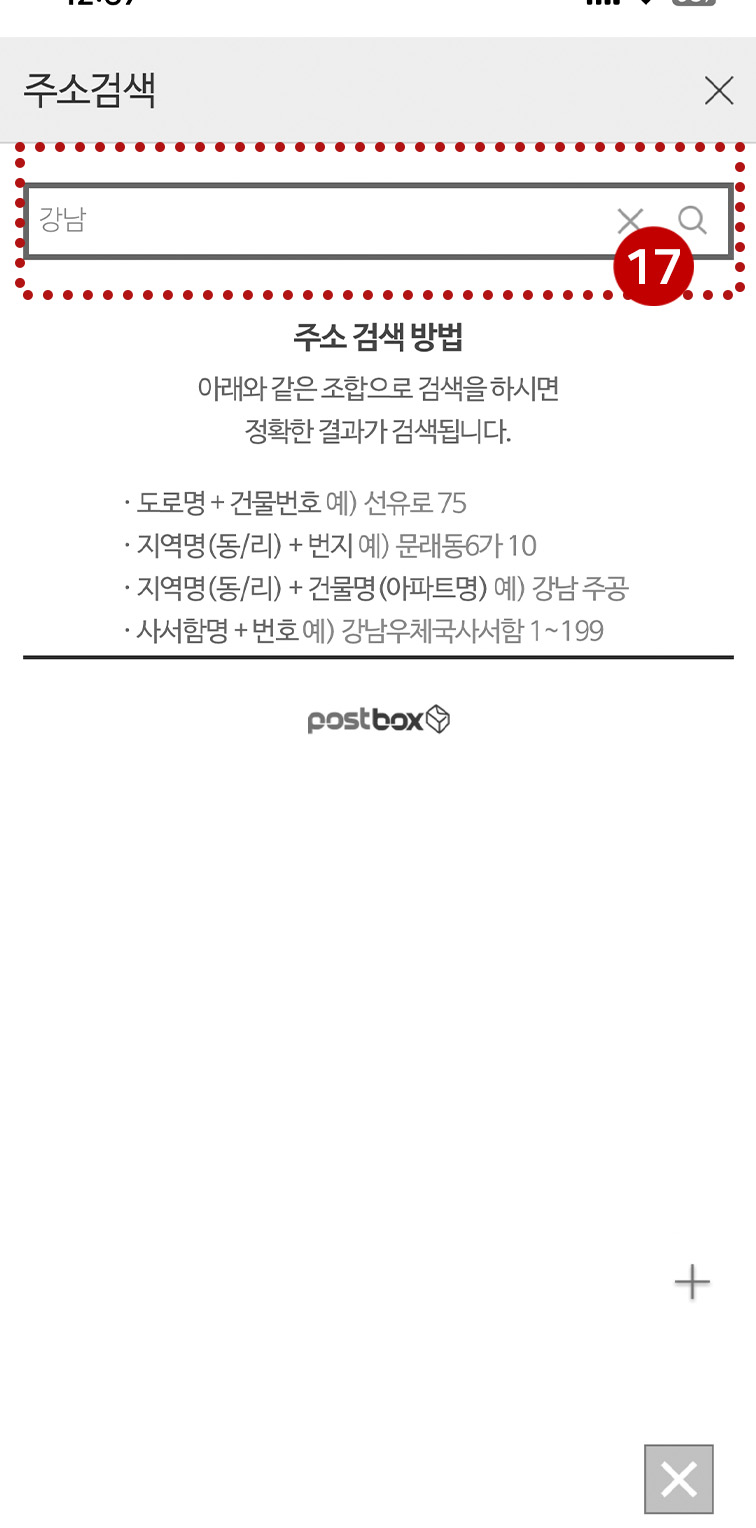
- Step 17: In the search bar, type in your address
-
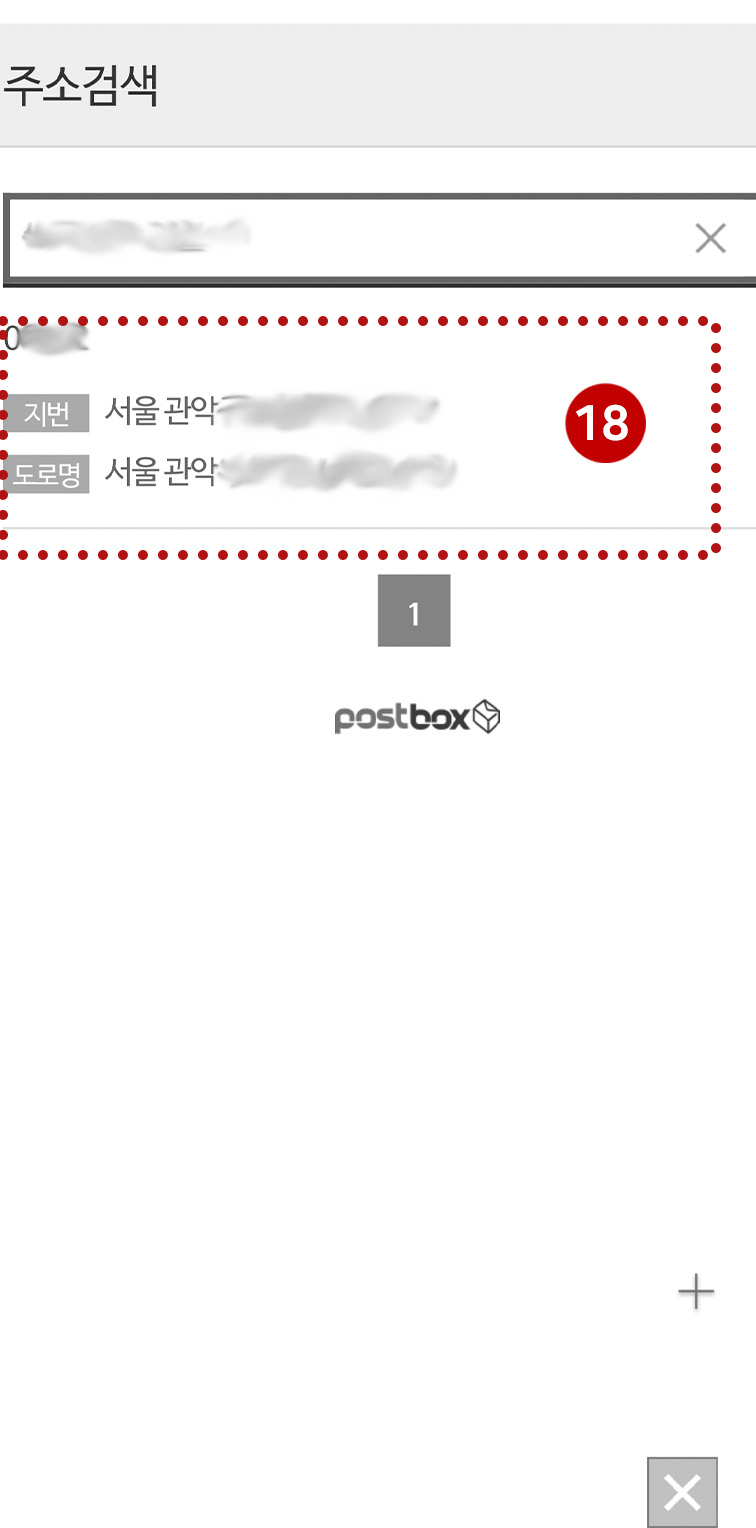
- Step 18: Click on the address that matches your address
-
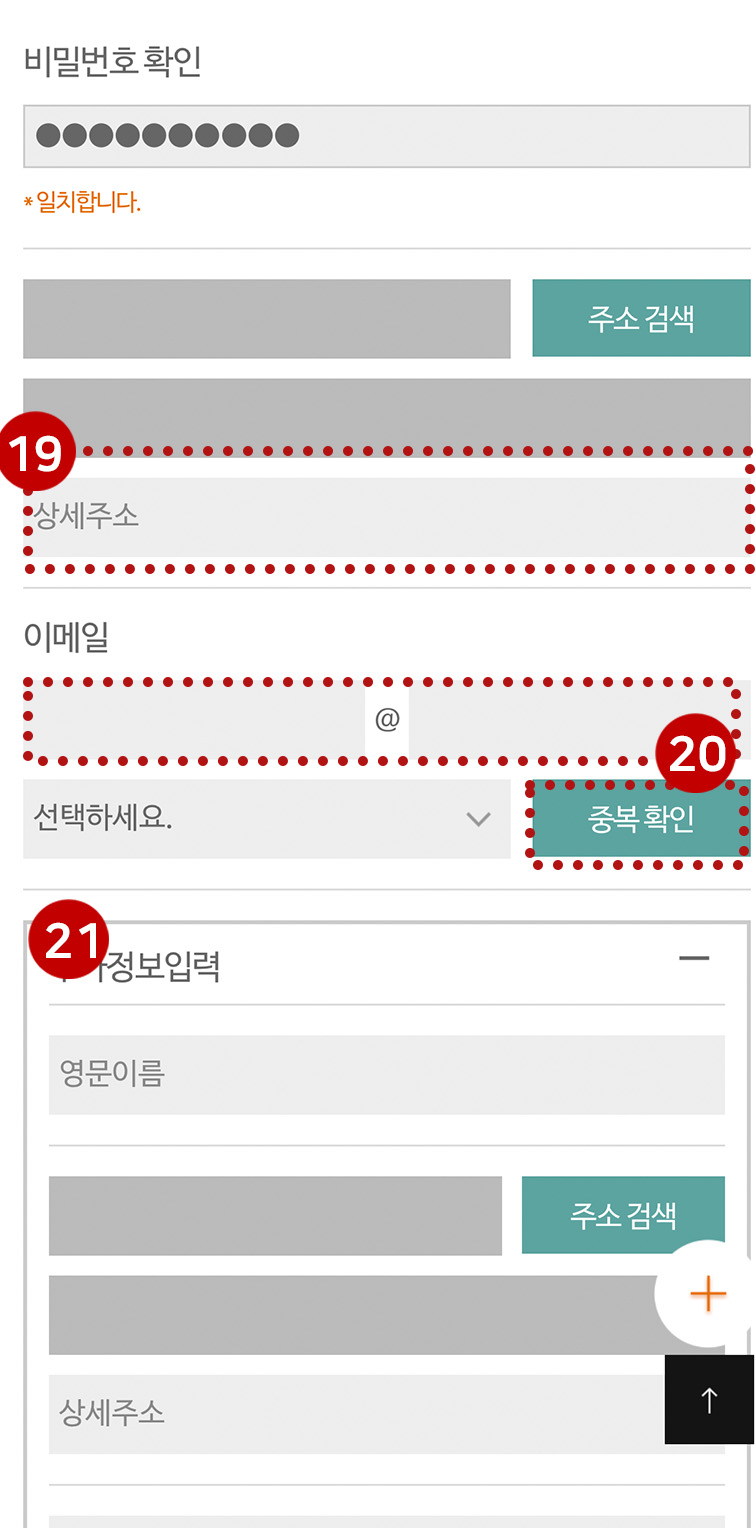
- Step 19: Type in the specific address (room number)
- Step 20: Type in your email address then click on the 종복확인 button to verify the email
- Step 21: The next field is for alternative or additional addresses (optional)
-
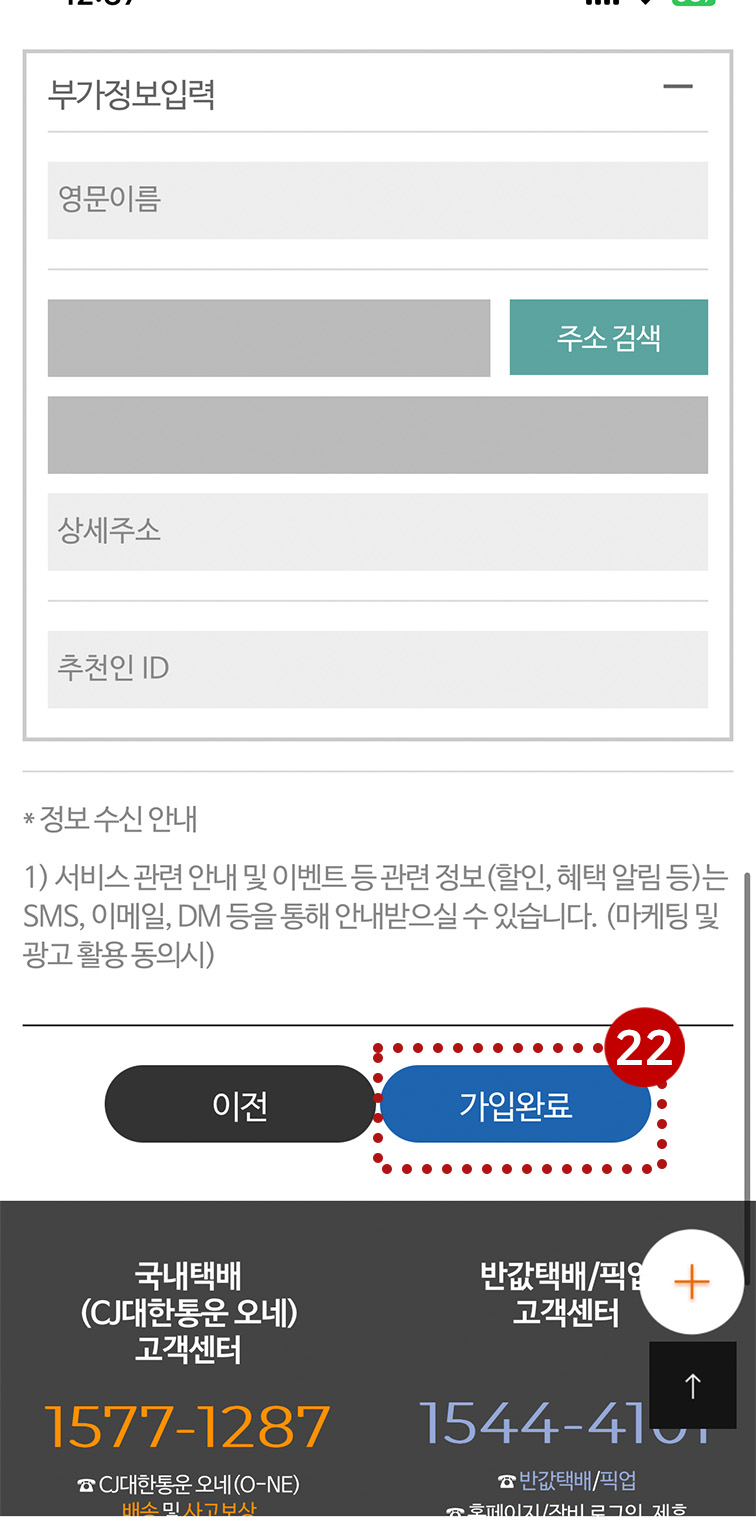
- Step 22: Click on the 가입완료 button to finish the registration. You can now use the account
- Step 0: Download the GS25편의점택배 app on your phone
- Popup messages asking for permission to access your phone's camera and other features will appear
- Step1: On the main screen, click on the 국내택배예약 button
- Step 2: Click on the 회원가입 button
- Step 3: Click on the 일반회원 가입 button if this is for personal use
- Step 4: You will have to verify your identity on the app, click on the 휴대전화 인증 button
- Step 5: At the verification screen, select your telecom
- Step 6: Click on 전체동의 then click on 문자(SMS)로 인증하기 - You can also use the PASS 인증 if you already have the PASS application
- Step 7: Enter your Name, as indicated on your Resident card (all caps and family name first)
- Step 8: Enter your Resident Number
- Step 9: Enter your phone number
- Step 10: Enter the captcha code and click on the 인증정보(이름/휴대번호)기억하기
- Step 11: Click on the 확인 button
- Step 12: Under the 인증번호 field, enter the verification code sent to your phone then click on the 인증확인 button
- Step 13: At the 약관동의 page, you have to agree to the terms and conditions of the service. You can just select the 모두동의합니다 to agree to all the terms and conditions, or you can click on the 미동의 on the optional (선택) items
- Step 14: After the verification process, you can now input your information. In the 아이디 field, type in your desired ID (should combination of 5-12 english + numbers). then click on the 종복확인 button to verify if the ID is available.
- Step 15: In the 비밀번호 portion type in your desired password. Make sure to type your password again in the bottom field
- Step 16: In the next field, click on the 주소검색 button to enter your address.
- Step 17: In the search bar, type in your address
- Step 18: Click on the address that matches your address
- Step 19: Type in the specific address (room number)
- Step 20: Type in your email address then click on the 종복확인 button to verify the email
- Step 21: The next field is for alternative or additional addresses (optional)
- Step 22: Click on the 가입완료 button to finish the registration. You can now use the account
Make a booking for domestic shipping 국내택배예약
-
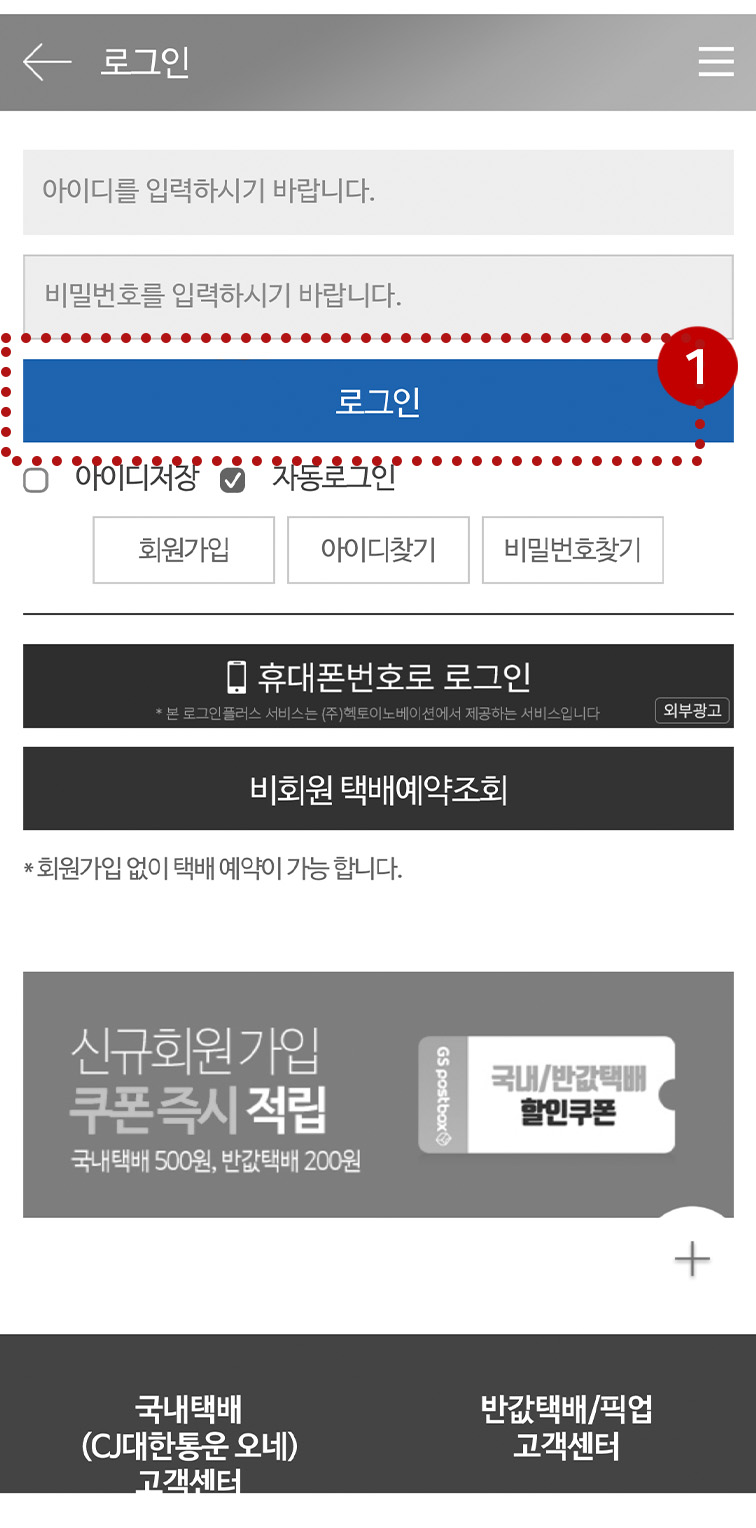
Step 1: Login your account
-
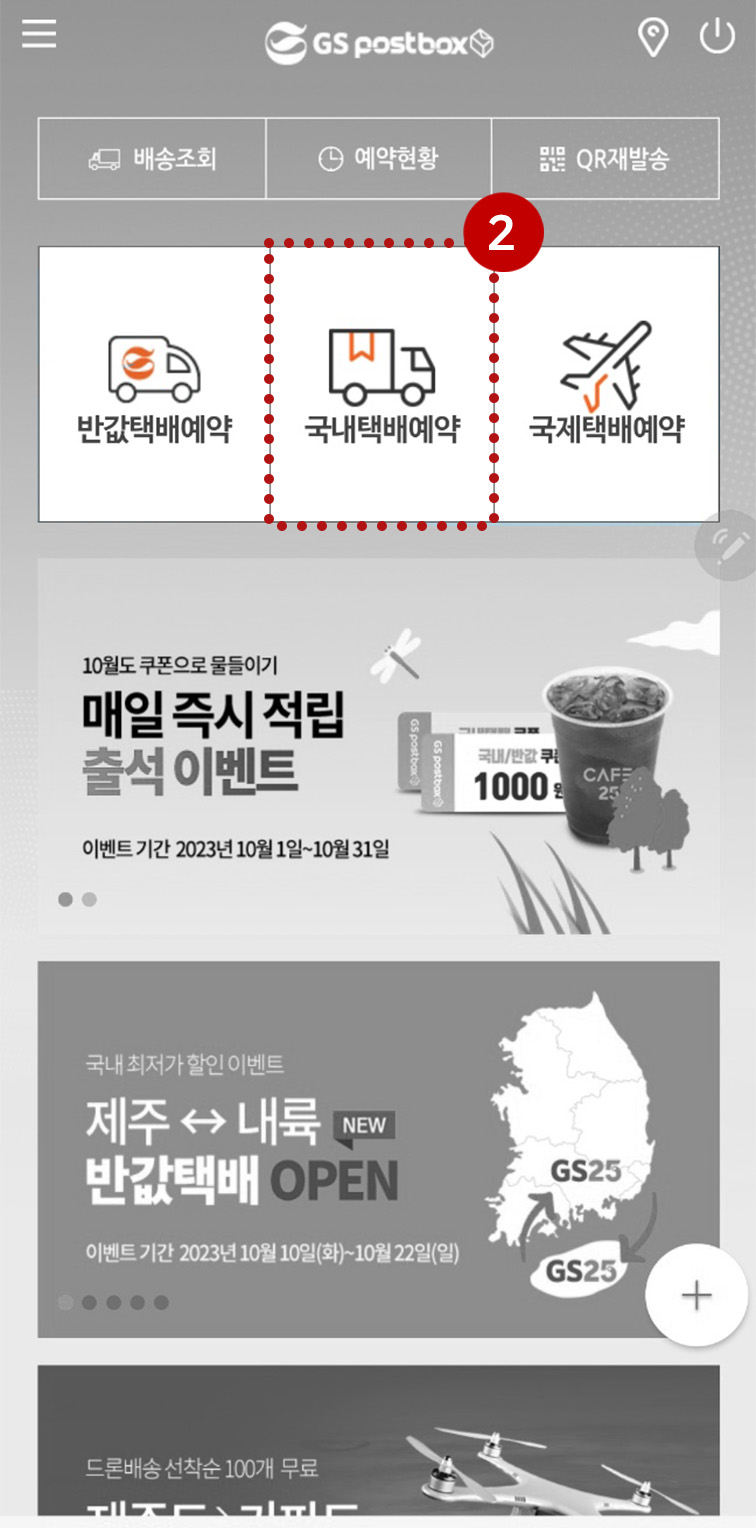
Step 2: Click on the 국내택배예약 button or move (may not always appear)
-
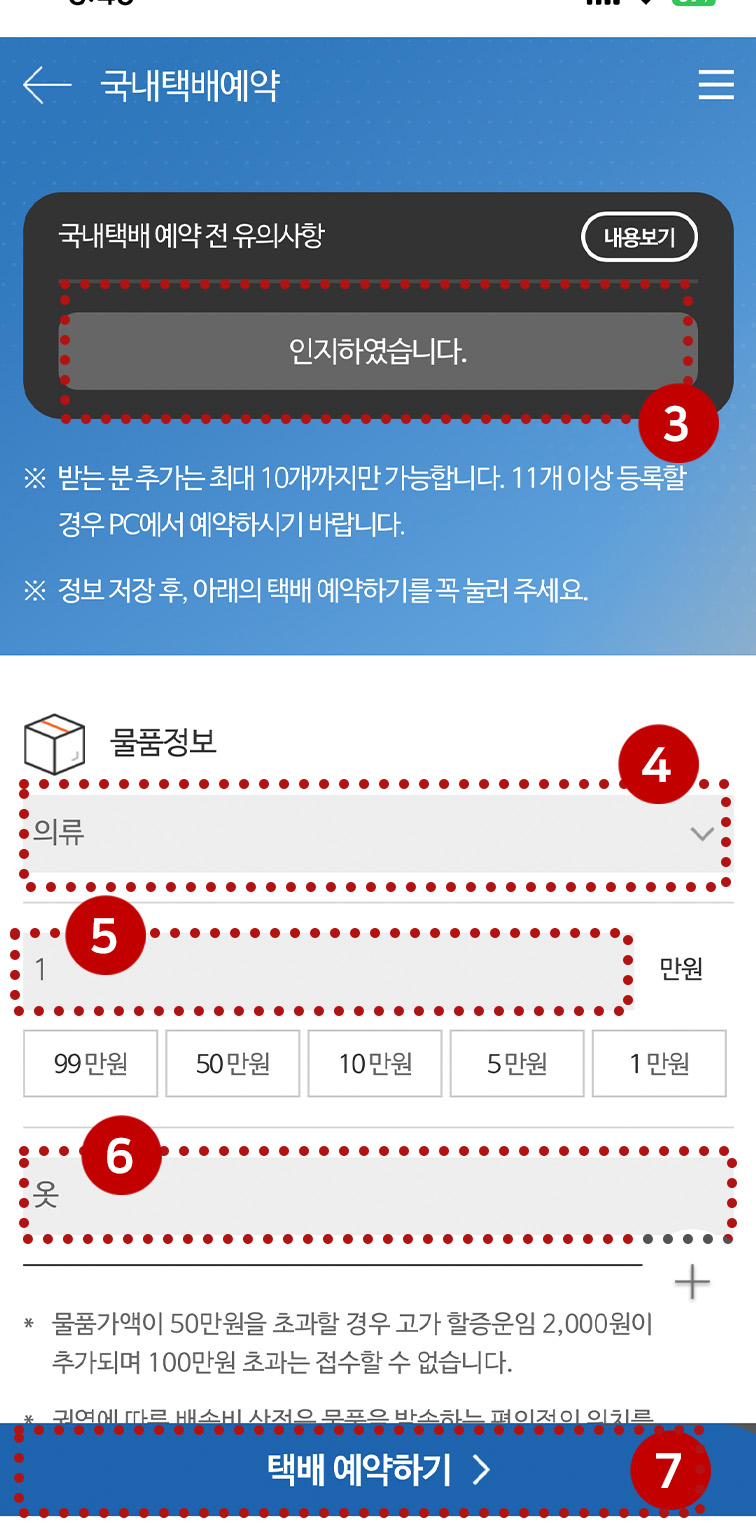
Step 3: Click on the 인지하였습니다 button to agree to that there are no restricted items in the box and that it is well packed
Step 4: Under 물품정보, select what kind of item you are sending in your package
Step 5: Indicate the value of the item to be sent
Step 6: Write down how the item should be registered as (Gift for a friend, sample, etc.)
Step 7: Click on the 태배예약하기 button
-
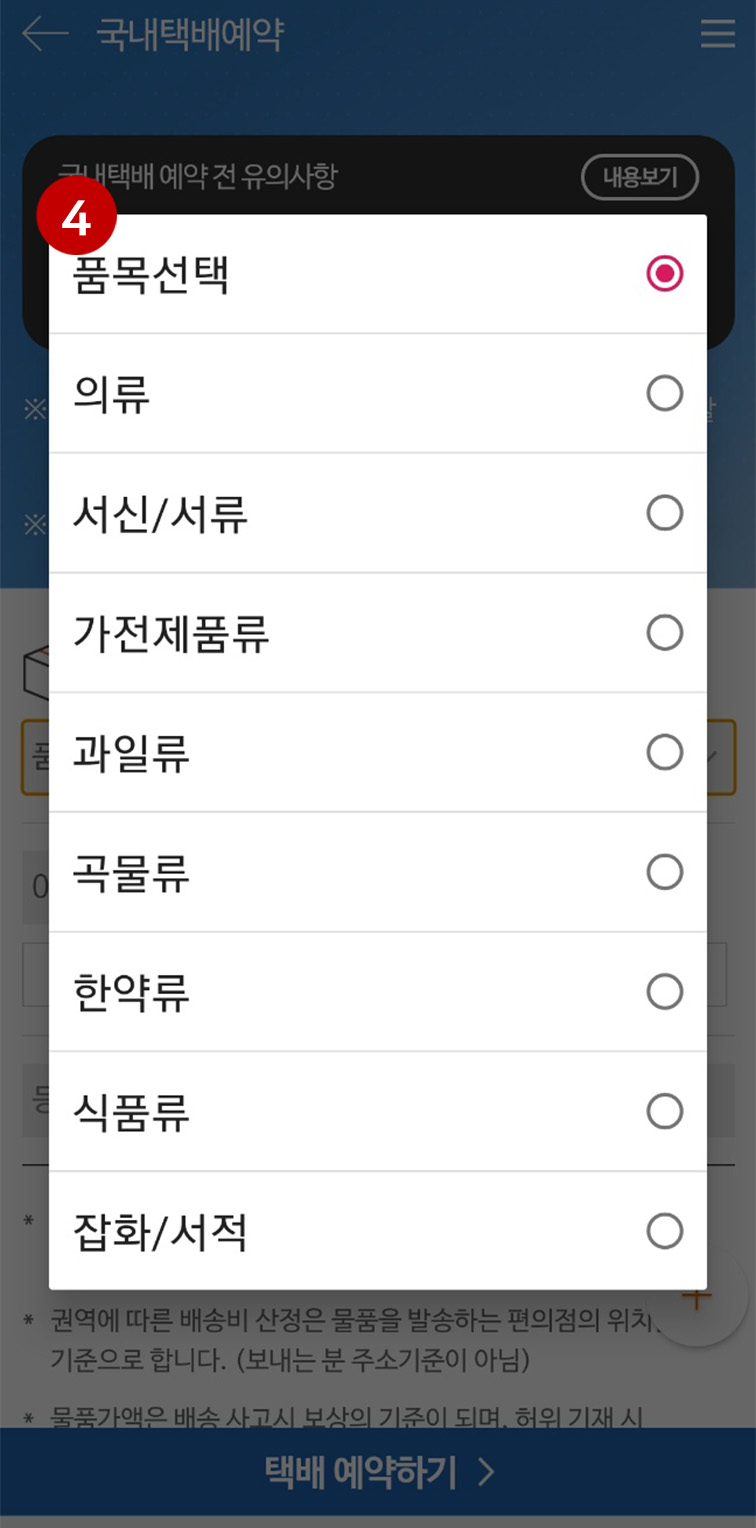
Select what type of item you are sending
-
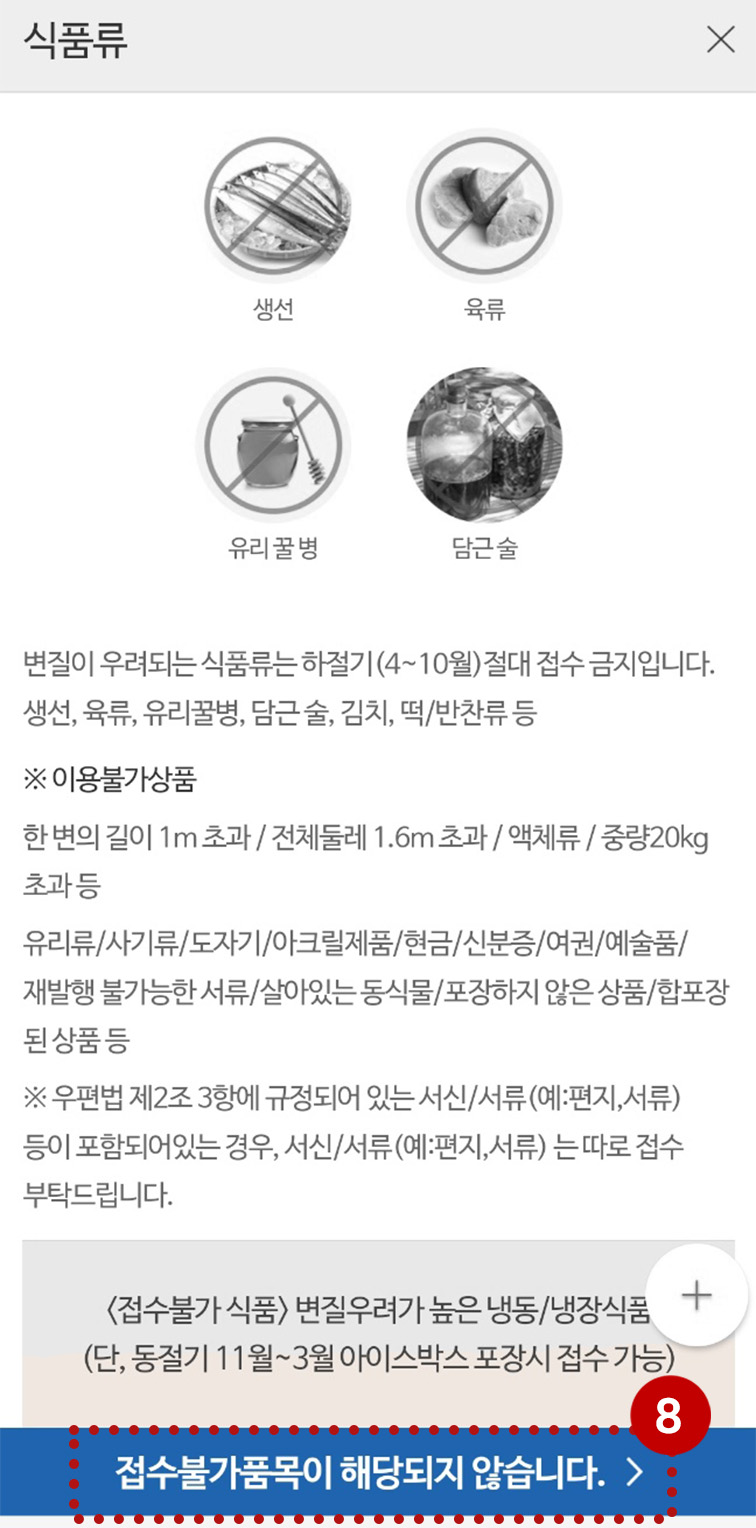
Step 8: Click on the 접수불가품목이 해당되지 않습니다 to indicate that you have no restricted items in the package
-
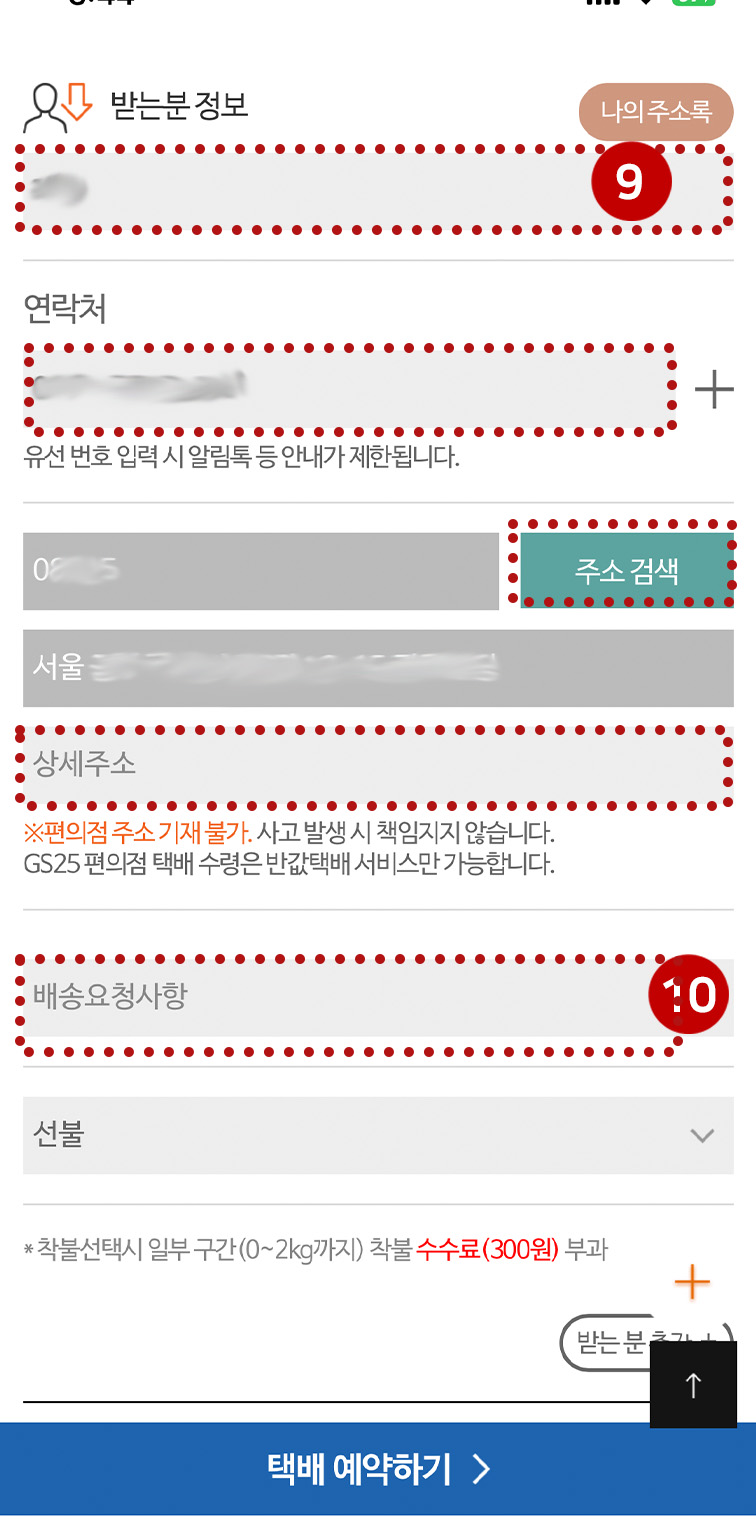
Step 9: Under 받는분정보 type in the details of the receiver
• 이름 Name
• 연락처 Contact number
• Click on the 주소검색 button to search for an address
• 상세주소: Detailed address (Room number)
Step 10: Type in delivery requests in the 배송요청사항
-
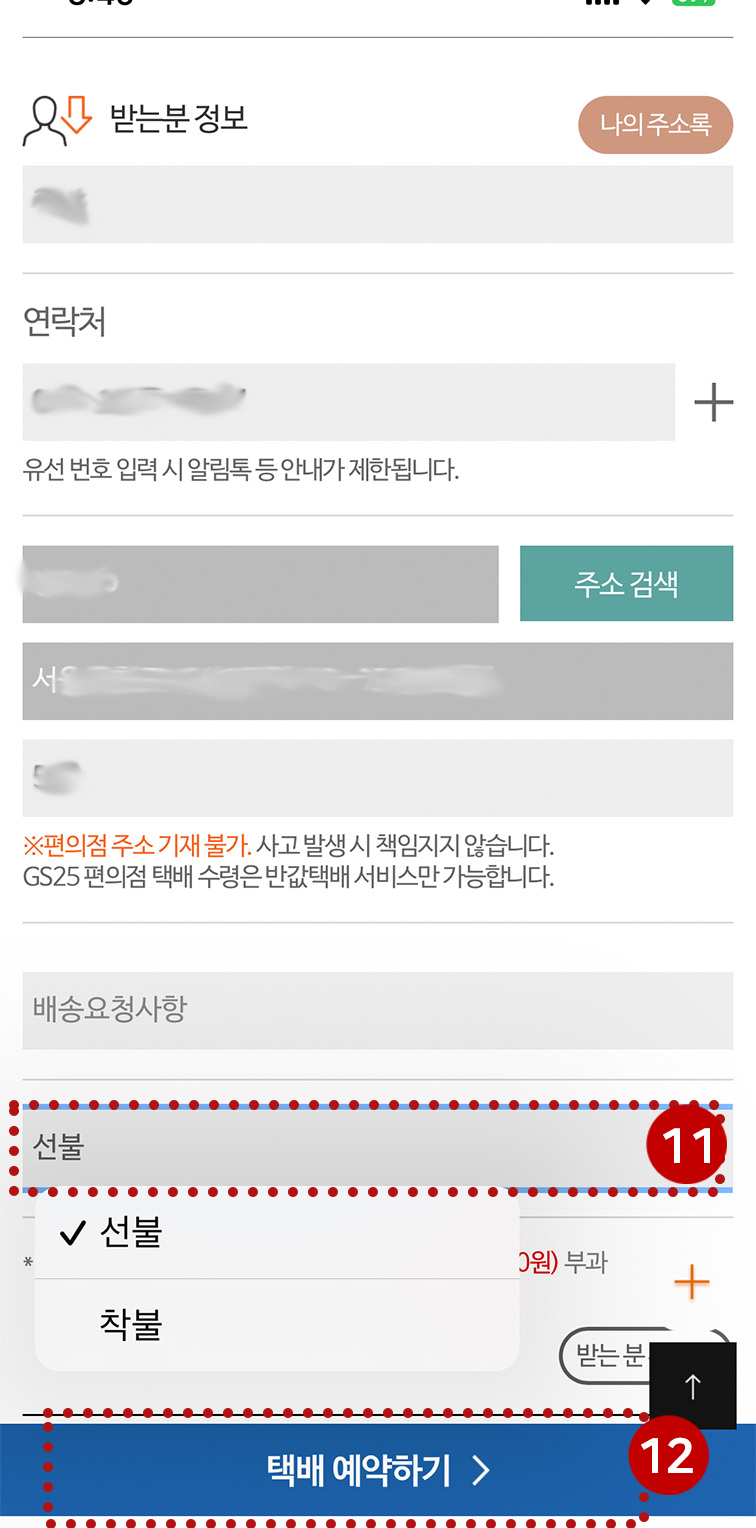
Step 11: Choose if you want to prepay (선불), or pay on delivery (착불)
Step 12: Click on the 택배 예약하기 button on the bottom of the screen
-
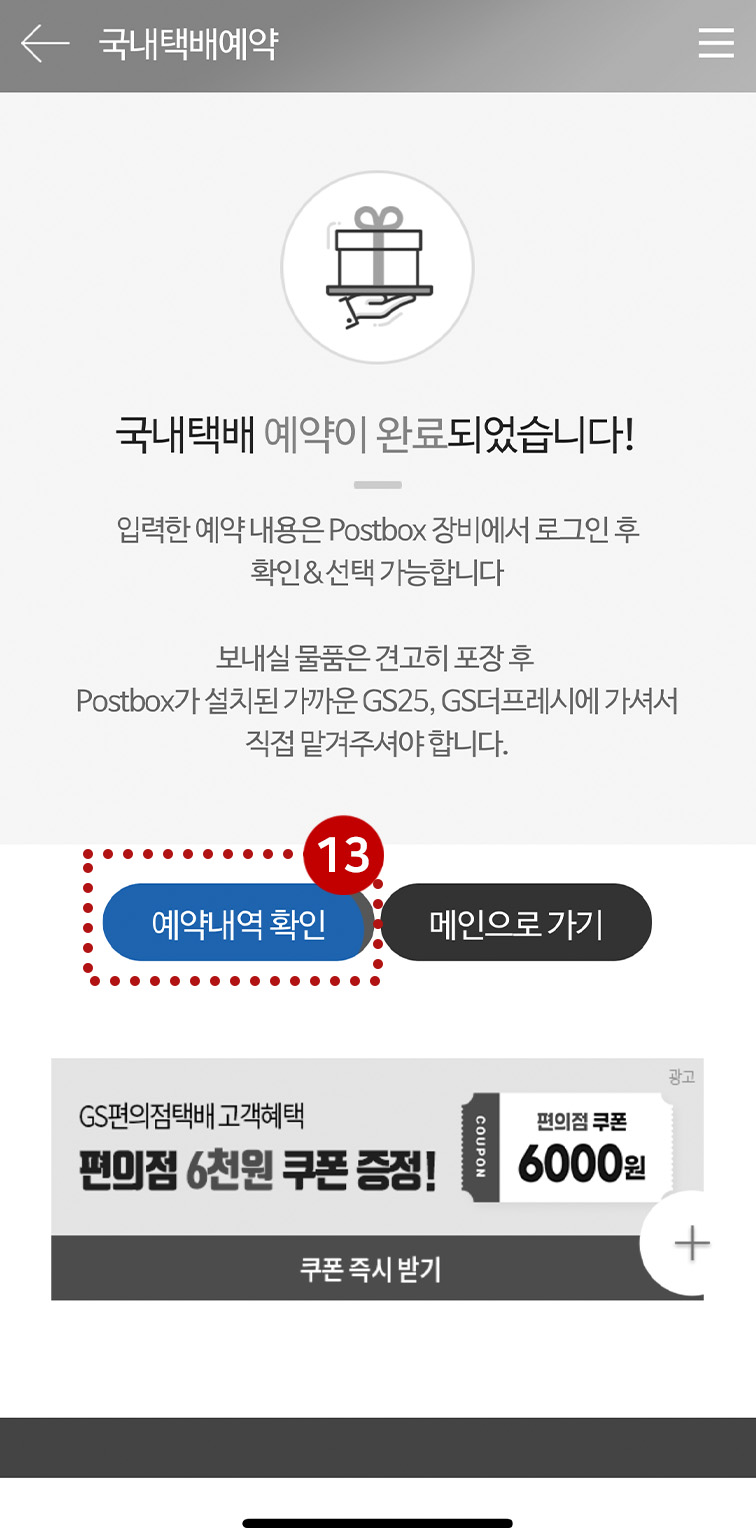
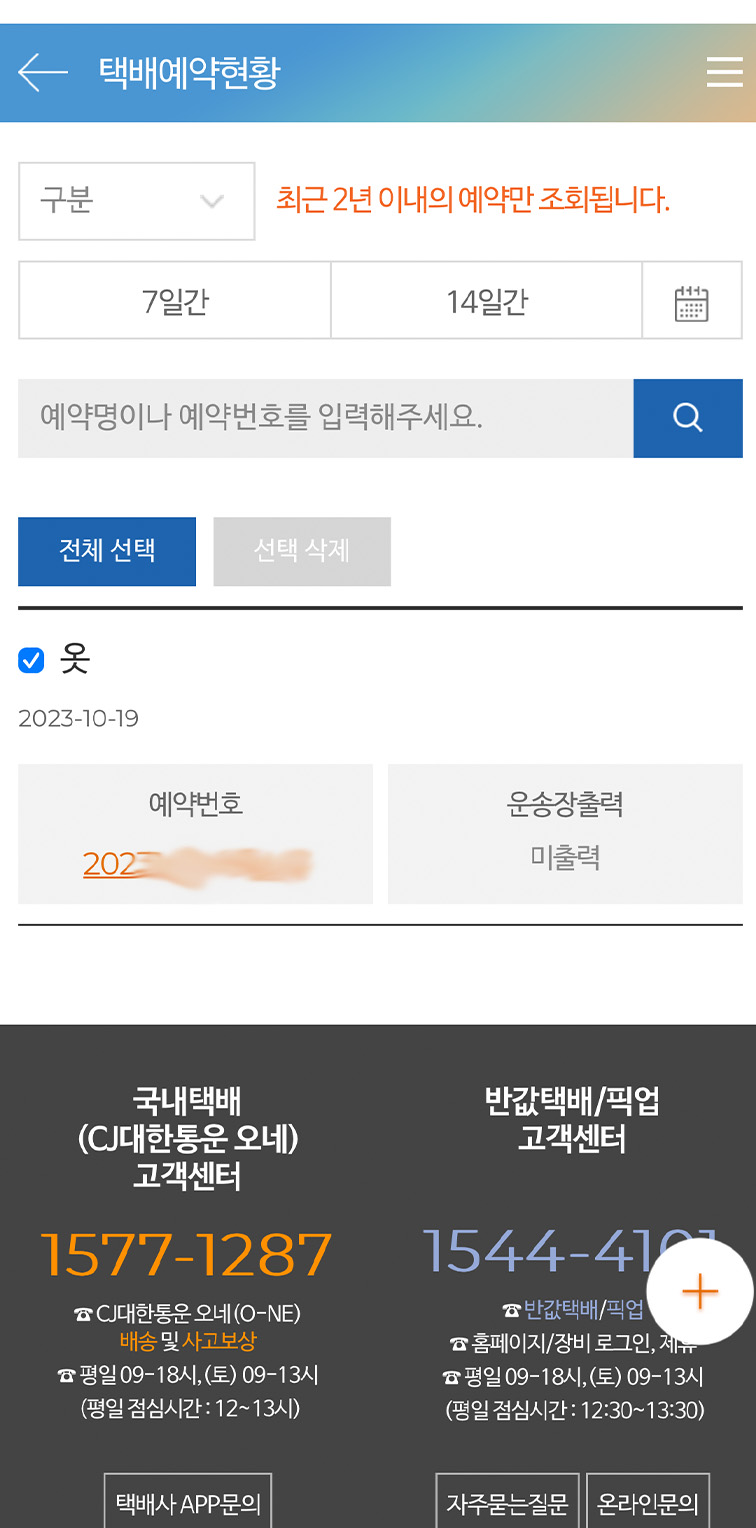
Step 13: A success message will appear on your screen, you can now click on 예약내역확인 to view your booking history
-
Step 14:Go to a GS25 to send the package
- Step 1: Login your account
- Step 2: Click on the 국내택배예약 button or move (may not always appear)
- Step 3: Click on the 인지하였습니다 button to agree to that there are no restricted items in the box and that it is well packed
- Step 4: Under 물품정보, select what kind of item you are sending in your package
- Step 5: Indicate the value of the item to be sent
- Step 6: Write down how the item should be registered as (Gift for a friend, sample, etc.)
- Step 7: Click on the 태배예약하기 button
- Step 8: Click on the 접수불가품목이 해당되지 않습니다 to indicate that you have no restricted items in the package
- Step 9: Under 받는분정보 type in the details of the receiver
- • 이름 Name
- • 연락처 Contact number
- • Click on the 주소검색 button to search for an address
- • 상세주소: Detailed address (Room number)
- Step 10: Type in delivery requests in the 배송요청사항
- Step 11: Choose if you want to prepay (선불), or pay on delivery (착불)
- Step 12: Click on the 택배 예약하기 button on the bottom of the screen
- Step 13: A success message will appear on your screen, you can now click on 예약내역확인 to view your booking history
- Step 14: Go to a GS25 to send the package
How to send your packages after booking
로그인이 필요합니다.